
Leveraging Pic-Time Blogging for SEO Wins
Written by Dylan Howell, Photographer & SEO expert
Blogging photography sessions have been a staple of my marketing process for my entire career. The past few years, I’ve run into a problem with having a large backlog of photoshoots that I want to publish, but the images themselves are sitting on hard to access physical archive hard drives.
Pic-Time has made this process easier, by allowing photographers to simply grab images directly from their client galleries. I’ve been able to blog a handful of weddings that I’d put off publishing for years.
Here’s my process for blogging with Pic-Time:

Best Practices for Setting Up Pic-Time Blogs SEO
There are a few best practices that you’ll want to follow when creating your blog posts with this tool. Here are the SEO steps that I’ve found to work best in my extensive testing.

After creating your layout and adding images + text, it’s time to click “Share & SEO” and then “Setup SEO”.

Controlling Indexation + Canonical URL

Pic-Time is allowing you to have complete control over the indexation of your content. You can create a portfolio-only blog post that is not included in search results, by not clicking to allow indexing of the page. This can be useful if you are blogging a topic that is already covered by another page/post on your website and you don’t want them to compete. It can also be useful if the content is not useful for users from search engines.

If you do want it indexed, you can choose to only let this content be indexed on your website. This will stop the blog post from being indexed on the pic-time.com built in domain or your Pic-Time custom gallery domain. (Example: dylanmhowell.pic-time.com or gallery.dylanmhowell.com)
This setting keeps your content from being indexed in two separate locations and then competing against itself.
Finally, you can set the canonical URL - this tells search engines where to attribute the content.
In this case, I’m embedding the blog post on my website and created a custom blog post permalink with my SEO goal to rank for the wedding venue in mind. It’s typically best to not use client names or dates in these URLs, when possible.
Title & Description
The title for your blog post is a required field, but will not be used if embedded on your website. You should use your website platform to create an optimized title for your post. The example for this blog post is “Legion of Honor Wedding | Dylan M Howell”.

Alt text and image file names
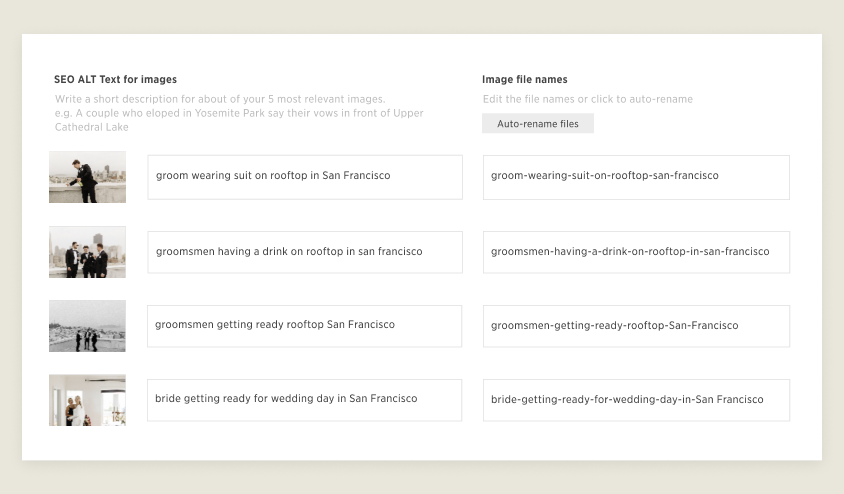
A major benefit of this platform for crafting a blog post is the ability to quickly and easily update filenames for your images. Most website platforms make this process difficult and most photographers export their images for final delivery with filenames that are not optimized for search engines.
I like to write descriptive and helpful ALT Text for my images and then click “Auto-rename files” to instantly create optimized filenames. If you need tips on writing proper ALT Text, check out our guide.
Note: The file rename only renames the blog photos and will not affect your Pic-Time gallery files.
Heading Tags

The text layouts use heading tags naturally, allowing you to worry less about your post’s heading formatting and more about quickly creating great content. The Title Layouts feature h1 headings and the first two text layouts include h2 headings. This will give you the ability to add some basic heading structure to your post, without too much effort or technical knowledge.
Pic-Time Blogging Performance Optimization
Pic-Time does a bit of technical magic in the backend to make sure that your blog posts load extremely quickly. The images are lazy loaded, allowing the browser to grab images just before they’re going to become visible to the user. The images are optimized for different screen sizes and devices, resulting in fast loading times on mobile and desktop devices. Finally, they use a blazing fast Microsoft Azure CDN to deliver the images. This means users in any location won’t be waiting for a slow server on the other side of the world to get the images.
Sitemap & other optimization that Pic-Time automatically does behind the scenes to improve SEO
If you’re embedding this blog post on your website, your platform should automatically create a sitemap entry for the page/post like normal.
If you’re using the built in pic-time domain, or a custom pic-time domain, the new blog post will be added to a sitemap with images included.

If you’re going to use the pic-time or custom domain, you can submit this sitemap directly to Google Search Console to speed up crawling and indexation. It’s found at /sitemap.xml.
For users that will be embedding the blog posts on your website, skip this step and just verify that your platform’s sitemap is submitted to Google.
Content Tips
These blog posts should be easy and image forward, but it can be helpful to add a bit of useful data for the potential searchers. Depending on the topic you’re targeting, it can be great to add simple information about the photoshoot location, or any other unique information.

In my test blog posts, I added the wedding venue address, linked out to their website, and tried to include information that searchers were looking for: pricing, capacity, reviews, etc.
The Web Component Embed Option

Pic-Time uses a technology called Web-Component. This means that the blog is actually part of the page, so all the SEO scoring and credits count for the website it's on. Plus, the embedded code is lightning fast - it's already pre-rendered and injected without waiting for other scripts to load. So, it's usually faster than a blog on WordPress or Squarespace.
I’ve seen the content inside my Pic-Time embedded blogs rank properly on my website. This is true for both text and images. Your images will show up in image search, just like any image uploaded to your site directly.
You then need to embed it in the custom HTML block for WordPress, the code block for Squarespace, or the embed code tool for Showit. Make sure to check out this detailed guide all about embedding.
Post Publishing Tips
After you’ve hit publish on your new blog post, you can manually submit it to Google for indexation. You do this by “inspecting” the new URL in the top bar inside Google Search Console.

You can then “Request Indexing.”

Once you’ve done this, now’s the time to post the link on social media and send it to your email list (if you have one!). With the Promo Video Maker, you can easily produce a scrolling video preview of your blog post that can be uploaded on various social media platforms like Instagram Reels, Stories, and TikTok.
You can also pin the images directly from your new blog post to Pinterest. To learn more about how Pic-time Blogs and Pinterest work together, click here.
What to expect from your new blog posts? How do you know they’re working?
Blogging can be more of a long game than social media. You can expect them to be indexed within the first week or so of publishing, and then to fall out of the index temporarily, before returning to search results reliably soon after.
Most session type blog posts will take 3-6 months to reach their best potential ranking, depending on competition. You can track the traffic from Google in the Performance report.

FAQ - Should I fill the SEO section both on Pic-Time and on the website? Should I fill in the same information?
If you’re embedding the blog post on your website, you don’t need to write an SEO description inside Pic-Time. It’s only necessary if you’re going to only publish this blog as a standalone page, not embedded on a website. It doesn’t hurt anything to write this as a fallback, but it will not be used by search engines when embedded on another web platform.
How to Get Started
Head over to one of your Client Galleries, navigate to the Photos tab, and click on the blog icon to create your first blog post. Get creative and start growing your online presence with Blogs today!
Dylan recently spoke about optimizing SEO at our “Perfect Your Blogging” Webinar, which you can watch here. Check out Dylan on Instagram and Facebook, and explore his Website.

Written by Dylan Howell . Dylan is a photographer, WordPress developer, and SEO expert based in Portland, Oregon. He founded Fuel Your Photos with Corey Potter and co-runs Sightsee Designs. Dylan helps professional creatives worldwide optimize their online presence and grow their businesses in the process.

